1. Install
Make sure that you have Eclipse 3.0 (production release). Install the plugin from the update site: http://sangam.sourceforge.net/plugin/site.xml
For those who are new to plugin installation, this involves the following steps:
- Select Help->Software Updates->Find and Install from the menu bar. The Install/Update dialog will pop up.
- Select Search for new features to install in the dialog, and press Next.
- Click on Add Update Site...
- In the New Update Site dialog, enter Sangam in the Name field, and http://sangam.sourceforge.net/plugin/ in the URL field.
- Click on OK to close the dialog.
- Select Sangam. Press Next.
- Select org.sangam.feature. Press Next.
- Read the License Agreement. Select I accept the terms in the license agreements, and press Next. If you do not accept the license agreement, you cannot install the plugin.
- Click on Finish. The plug-in will be downloaded and installed automatically.
2. Configure
Configuring the Sangam Plugin involves starting the Syncshare server (for hosting collaboration sessions), creating messaging boards and users on it, and providing Sangam the necessary login information.
2.1 Start Server
Before starting distributed pair programming, the Syncshare server needs to be started. Only one instance of server is required. Follow the steps to setup and start the Syncshare server.
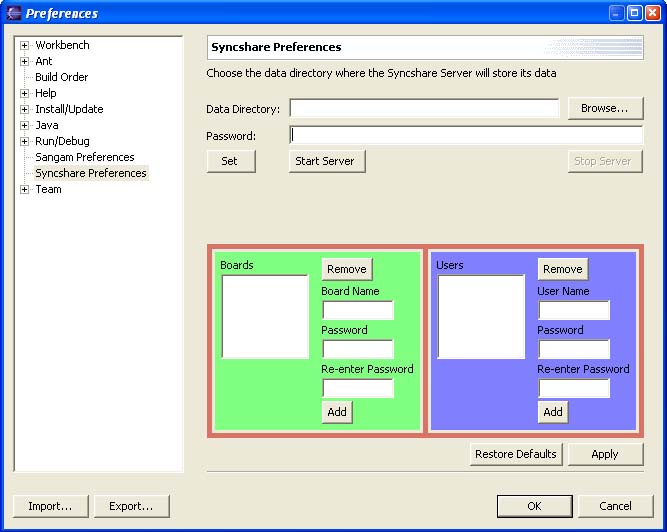
Select Window->Preferences from the menu bar. The Preferences dialog will show. In the left pane of the Preferences window, select Syncshare Preferences. Figure 1 is the screenshot of the Syncshare Preferences. The data directory can be any directory of your choice. Choose a password you like, and press Set. Then, start the server by clicking Start Server. You are now ready to create boards and users.

2.2 Board/User creation
Once the server is started, you can add new messaging boards. Enter the name of your board in Board Name, and give it a password. Press Add.
To create new users, first select the board in the list of Boards. Then enter the User Name and Password. Press Add, and a new user will be added.You may add as many users as you like.
After adding the users, press OK to close the dialog.
2.3 Configure Sangam
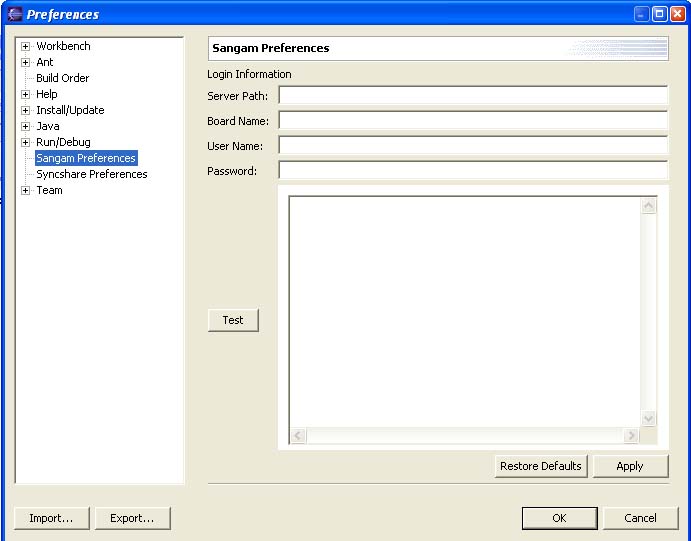
Select Window->Preferences from the menu bar. The Preferences dialog will show. In the left pane of the Preferences window, select Sangam Preferences. Figure 2 is the screenshot of the Sangam Preferences. Enter your Syncshare server details (server path this will be URL of the Syncshare server, board name, user name, and password). Remember, you should have created an account on the server as given in 2.2 above. Before you proceed, you must verify that you have a valid connection. Click on Test, and check the textbox to see if you could get the connection. If you did, then you may proceed to the next step. If not, check your server path and login details NOTE: Make sure server is started Click OK to close the dialog.

2.4 File Association
In this step, you are going to set the file association for Java files.
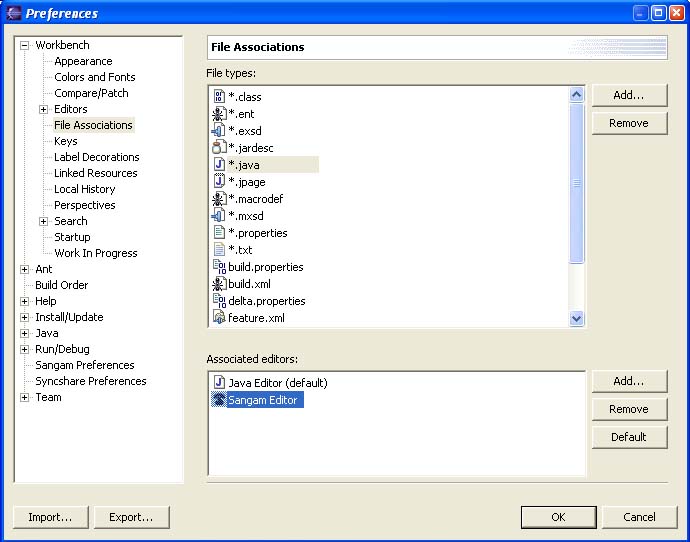
Select Window->Preferences from the menu bar. The Preferences dialog will show. In the left pane of the Preferences window, select Workbench -> File Associations. Choose *.java in File types. You should see "Sangam Editor" in the Associated editors box. Highlight that and click the Default button. Click ok.

2.5 Customize Perspective
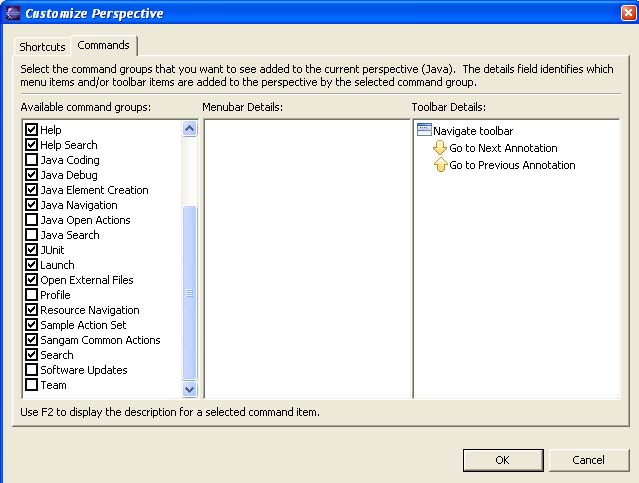
In order to bring the Sangam buttons into your perspective, choose Window->Customize Perspective. Select the Commands tab. You should see Sangam Command Actions in the Available command groups.

Make sure the box in front of it is checked. When you click ok, you should be able to see the Connect and the Drive buttons on your toolbar as shown below. Initially, the Connect button is enabled, and the Drive button is disabled.
You are now ready to begin pair programming with Sangam.